Listen up, I have 3 little girls. One of my girls is a picky eater, one is not and one is just starting to eat table food. As a mommy (and wife…let’s be real), it can be frustrating to feed everyone and make them all happy without making three separate meals. In our house, I refuse to make separate meals for the kids. I do my best to make something healthy everyone will appreciate and enjoy. For instance, my oldest daughter doesn’t care for spaghetti but will eat it if she can scoop it up with tortilla chips and skip the noodles. So, when I make spaghetti, I eliminate the noodles for her and throw a couple of tortilla chips her way…Voila…happy eater! My middle child is my pickiest eater. She LOVES her breads/ carbs and sugar. Donuts are her FAVORITE “food” if that gives you an idea of how difficult it is to find things she likes and will eat. With her I have to “jazz” up her meal…make it look appealing and she will eat it (add a bit of butter and salt and she is usually happy). The baby, well, she has one tooth in her head and doesn’t care for baby food anymore. She wants to be big like her sisters and eat what they eat.
So what is a momma to do?
Over the years, I have collected recipes that are kid-friendly, HEALTHY, and crowd-pleasers. These recipes are my kid-approved, go-to recipes I use on a weekly rotation. I thought I would share some of my go-to breakfast recipes with all of you. I figure, if you are a momma making breakfast for kids, you are probably in the same boat as every other momma out there! Enjoy!
Breakfast Recipes my kids LOVE

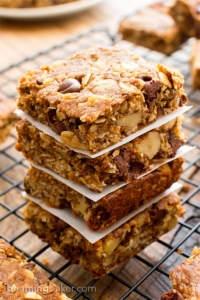
Gluten-Free, Vegan Chocolate Peanut Butter Breakfast Bars
You had me at chocolate. And peanut butter. And the no-bake factor is always a plus. And they are gluten-free, to boot.
When I found this recipe on Vegan Heartland, I couldn’t wait to try it. I was surprised to find that I had all of the ingredients on hand (if you’re vegan, you probably do, too). As Matthew (Vegan Heartland author) notes in his recipe post, these crunchy, sweet bars are rich in protein, fiber, antioxidants + omega-3 and omega-6 fatty acids. But don’t think that means you can eat the whole pan, cuz short on calories they are not. Nor are they short on flavor or texture. I LOVE ’em!!!
- 1½ cups rolled oats (use gluten-free if desired)
- ¼ cup flax seed meal
- ⅛ cup chia seeds
- ¼ cup sunflower seeds
- ¼ cup sesame seeds
- ⅓ cup pumpkin seeds
- ½ cup cashews
- ½ cup almonds
- ½ cup agave nectar
- 1 cup natural peanut butter (or nut butter of choice – I used almond butter)
- ½ cup vegan, gf chocolate chips (such as Enjoy Life Mini Chips)
- Line an 8×8 (or similar size) pan or baking dish with parchment paper. Leave extra on the sides to use as handles for removing the bars later.
- In a large bowl, combine the oats, flax seed meal, seeds and nuts; mix thoroughly.
- Add agave nectar to the mixture and stir until well coated. Add peanut butter (or other nut butter) to the mixture and mix until well combined.
- Scoop the mixture into the prepared pan/baking dish and press firmly until it is evenly distributed. Original recipe instructs to allow mixture to then sit overnight (to firm up) before cutting into bars. I’m not that patient—I put mine in the freezer for an hour or so and it seemed to work just fine.
- Using the parchment paper handles, remove the entire block from pan/baking dish, then cut into bars.
*I found that the bars start to lose their firmness if left out for too long. Best to store them in the freezer. When storing the bars in a container, place a sheet of parchment paper between the layers to avoid bars sticking together.

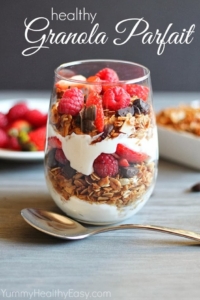
Fruity Breakfast Parfaits
This is an especially ideal option when summer fruits and berries are tumbling off of tree and vine. But during the autumn and winter months, dried or frozen fruits and berries work perfectly as well. Plus, these are a great opportunity to try out whatever goodies are in season as the months roll by. Our local market is usually packed with an incredible array of fruits, so we can have a different parfait every day of the week.
All you need is a selection of your favorite fruits, some plain Greek yogurt (the thicker yogurts work best), and a topping of your choice. Layer the fruit and yogurt in the jars — we usually put fruit on the bottom and yogurt on top, but you can create as many layers as you’d like in whatever order you want. Store them in the fridge and when ready to eat, just add your favorite crunchy topping and there you have it. It’s breakfast on the go that doesn’t feel like breakfast on the go.
7 of my favorite combinations:
Strawberries and pistachios
Blueberries and walnuts
Meyer lemon curd or lemon preserves with almonds
Blackberries and raspberries with homemade granola
Peaches and Cheerios
Apricots, cherries and cashews
Dates and pecans
Homemade Granola Recipe
Prep time: 10 minutes
Total time: 50 minutes
Yield: About 4 cups
INGREDIENTS
- 3 cups rolled oats
- 1.5 cups nuts and seeds of your choice (almonds, pecans, pumpkin seeds, walnuts, flaxseeds, etc)
- 0.5 cups freshly squeezed apple juice
- 0.5 cups maple syrup (or honey for a non-vegan version)
- 0.25 cups vegetable oil
- 1 tablespoon vanilla extract
- 1/2 teaspoon ground cinnamon
- 1/4 teaspoon ground cloves
- 1 teaspoon fine sea salt
INSTRUCTIONS
Preheat oven to 325 degrees Fahrenheit.
In a large bowl, combine the oats with the nuts and seeds.
In a small sauce pan, combine the apple juice, honey, oil, vanilla, and spices. Over a very low heat, warm the mixture just until the honey has softened and everything is well combined. Remove from heat, and pour the mixture over the oats and nuts. Stir until thoroughly mixed.
Spread the mixture in a single thin layer on a baking sheet lined with parchment paper. Make sure there is plenty of space on the sheet to spread out the granola. If there is too much piled onto the baking sheet, the granola won’t be able to get crunchy. You may need to bake the mix in two batches depending on the size of your baking sheet and oven.
Bake for 30-40 minutes total, stirring every 12-14 minutes to make sure the granola browns evenly. When the granola is an even golden brown, remove from the oven and let cool completely on a wire rack.

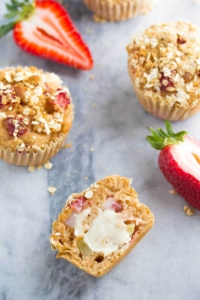
No Junk Apple, Cinnamon, and Strawberry Muffins
These no junk muffins are delicious! Sweetened with apples and a dash of maple syrup and easy on the saturated fat in favor of olive oil, they’re a healthy alternative to the average muffin, making them perfect for kids.
INGREDIENTS
2 apples
3 eggs
100g (3.5 oz or 2/3 cup unsifted) self-raising flour (gluten-free if you prefer)
2 tsp cinnamon
2 tbsp maple syrup
80-120ml olive oil / coconut oil (start with 80ml, add more if mix feels dry)
50g (1.8 oz) dried strawberry pieces
INSTRUCTIONS
- Preheat oven to 200°C (180°C fan-assisted), gas mark 6.
- Whisk the eggs with the maple syrup, cinnamon and olive oil (or gently melted coconut oil).
- Grate the apples and stir into the egg mixture with the strawberry pieces.
- Then fold in the self-raising flour with a metal spoon.
- Spoon into greaseproof muffin tins, and bake for approximately 20 minutes, until golden and cooked in the centre.
- Stick a knife in the centre of a muffin to check they are cooked – it should come out clean.
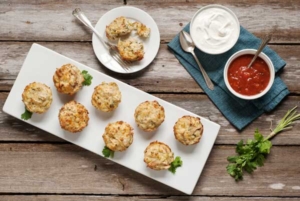
Gluten-Free Mexican Mini Quiches
We had a hot debate as to what to call these yummy babies – Mexican muffins? Savory cupcakes? Mini quiches? I never really came up with the perfect recipe title but I know this, I would never call these “impossible” anything. Not only are they seriously simple, they show just how “possible” great gluten free food can be!
INGREDIENTS
Gluten free, non-stick cooking spray
1 rotisserie chicken, shredded
1 ½ cup shredded cheddar cheese or dairy free cheese alternative shreds
1 (4 ounce) can mild green chilies, diced
½ cup gluten free all-purpose flour
½ teaspoon baking powder
½ cup buttermilk or ½ cup dairy free milk with 1 teaspoon lemon juice stirred into it
¼ cup sour cream or dairy free sour cream alternative plus more for serving
2 large organic, pasture eggs, lightly beaten
2 tablespoons fresh chives, minced (minced then measured)
¼ cup cilantro leave, minced (minced then measured) plus more for serving
1 cup prepared salsa
INSTRUCTIONS
Preheat oven to 375 degrees. Lightly spray a standard muffin pan with cooking spray.
In a large mixing bowl combine all the ingredients with a spoon until well mixed. Spoon the mixture into the prepared muffin tins.
Bake for 30 minutes or until browned and set. Run a dinner knife around the edges of the quiches, remove from the pan and serve with your favorite salsa, some extra sour cream, and cilantro.
SERVINGS
This Gluten Free Mexican Mini Quiches recipe serves 6 (serving size, 2 each)
* The views and opinions expressed on this blog are purely the blog owner’s. This blog accepts free manufacturers’ samples and forms of cash advertising, sponsorship, paid insertions or other forms of compensation. Affiliate links may be included in this post.

0 Comments